RAM Electronics is a manufacturer, distributor and reseller of Audio, Video, Computer and Networking connectivity products and accessories as well as a Custom and OEM Contract Manufacturer.
Friday, July 24, 2009
A FUN FILLED WEEK
THE WEATHER WAS GREAT, AND THE FLEA MARKET DAY
WAS A LOT OF FUN.
YOUR DONATED ITEMS HAVE BEEN POPULAR.
MORE ELECTRONIC ITEMS ARE NEEDED, DISHES ARE GOOD, LAMPS, FANS, CLOCKS, RADIOS, TV'S.
WE NEED MORE RAM PEOPLE TO COME OUT TO SUPPORT. JUST COME OUT AND YOU WILL ENJOY
WHAT IS GOING ON.
THERE ARE LOTS OF VENDORS AND STORES IN THE AREA. HEY SHOPRITE IS ACROSS THE STREET IF YOU NEED TO GROCERY SHOP. THERE IS A CHINESE BUFFET, A LOEWS AND WALGRENS TOO.
THE NEXT FLEA MARKET WILL BE HELD AUGUST 15, COME OUT AND ENJOY.....
WEDNESDAYS' LUNCH WAS Mmm, Mmm Good.
THANK YOU TO ALL THAT WHERE INVOLVED, WALT ON THE GRILL, EDITH AND EDDIE WITH THE ORGANIZING, SANG, CHAU, SARAN, KIM, DUNG, RITA, MARTIN, ED LAFFERTY AND VANITA WITH HELPING OUT WITH WHATEVER YOU WERE ASKED TO DO.
WE WOULD LIKE TO SEND A SPECIAL THANK YOU TO ALEX FOR ALL THE DONATIONS OF FOOD AND CONDIMENTS YOU PROVIDED.
WE HOPE TO DO THIS AGAIN FOR THE MONTH OF AUGUST. PLEASE SEND FEEDBACK AND SUGGESTIONS. WE LOVE THE VARIETY THAT IS PRESENT THIS YEAR...
New Custom Canare 4S8 Speaker Cables with Audioquest Connectors
New! Made in the USA!
Our latest Speaker Cable uses Canare 4S8 Studio Grade Speaker Cable. We Crimp Via Blue premium Gold plated Crimp Sleeves on the conductors so you will never have to worry about oxidation. We then install high-end Audioquest gold plated connectors. Both standard and biwire configurations are available.
We also offer them with just the crimp sleeves. They can be used "as-is", or you can easily add standard "screw-down" style connectors from a wide variety of manufacturers. If you'd like any brand we carry, we'll be happy to apply them for you. Choose from WBT, WBT nextgen, Audioquest, Via Blue, Calrad or others.
Crimp Sleeves:
Cables with Audioquest Banana Plugs over Via Blue Crimp Sleeves:
Custom Canare 4S8 Speaker Cable with Gold Audioquest Banana Plugs - LS
Custom Biwire Canare 4S8 Speaker Cable with Gold Audioquest Banana Plugs - LSB
Models with Via Blue Crimp Sleeves:
Custom Canare 4S8 Speaker Cable with Gold Crimp Sleeves - LSF
Custom Biwire Canare 4S8 Speaker Cable with Gold Crimp Sleeves - LSFF
Thursday, July 16, 2009
Connecting your PC to your HDTV - Powerstrip Settings for 720p
Powerstrip - The Update!
Our original "Powerstrip Guide for the powerstrip impaired" article was originally written back in the days when "HDTV" meant Rear Projection CRT TV's. While the basic usage has not changed, the usual use now is with LCD and Plasma TV's that are progressive scan rather than interlaced and when using a VGA to component converter are best set for 720p rather than the old 1080i/540p settings of old. In other words, we needed to do an update!
The idea here is we are connecting a VGA output from a computer to a Component Video input on the HDTV. The computer is RGB color and TV input is Component Video, so you need to use a conversion box that "transcodes" the signal. Popular transcoders are the Key Digital KD-VA5 and the Audioauthority 9A60. For those who are unlucky enough to have a Graphics card/chipset that does not support 720p (or the virtual equivalent 1280x720@60Hz) then there are converter boxes that don't just transcode but scale as well. Popular models of this type are the Audio Authority 1365 and the Calrad 40-880. You can go much further, of course and get a full blown scaler, but let's get back to the business at hand!
Powerstrip:
Download Powerstrip from EnTech Taiwan.
Powerstrip is not always strictly necessary since most new ATI and Nvidia drivers have built-in adjustments to help you eliminate overscan and get the image set properly on the screen. In any case it does an awesome job.
The first thing to do is get your Computer set up to output 1280x720@60Hz. That gets you into 720p territory.
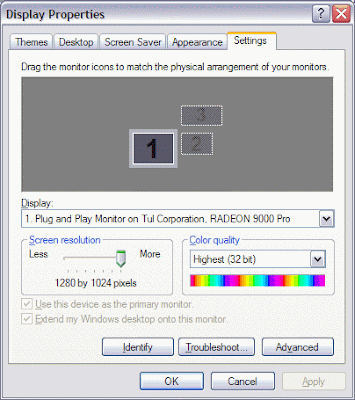
Open "Display Properties" (in "Control Panel") and click the "Settings" Tab. Adjust the "Resolution Slider until you get to 1280x720. Click "Apply".
You now should get the "Compatibility Warning" screen. Choose to apply the new settings without restarting.
Go ahead and click ok. The screen will go blank and then (hopefully) become visible at the new resolution. If you see nothing, or it becomes visible but is not something you can work with just do nothing for 15 seconds and it will revert back to the original settings automatically. Try it!
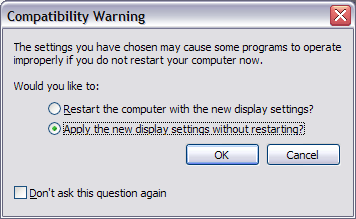
When you are compfortable that you can proceed click that "OK" button within the fifteen seconds.
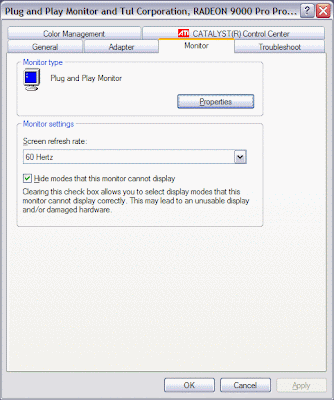
Next click the "Advanced" button, and then click the "Monitor" tab.
Confirm that the Screen refresh rate is 60Hz.
After that, you are ready to give it a whirl. Shut down the computer and connect it through the transcoder like this:
VGA Output->Transcoder->Component Video->HDTV
Now hopefully when you fire up the computer you get a picture on the screen. You should if the TV supports 720p. If not, connect it back up to your monitor and confirm your settings.
If you have a good clean image on the screen, you are probably now noticing that somethings wrong here. The top, bottom and sides of the "Desktop" are being partially cut off and making it difficult or impossible to do certain things.
Bottom:
Top: No minimize, maximize or close buttons! Yikes
Obviously this won't do!
So now start up powerstrip so you can get things started.
Once it starts it just pops up a "Tip of the day" and adds a little icon on your lower right Task Bar.
Right-click the taskbar icon and then select "Display profiles" and then "Configure".
Display profiles screen:
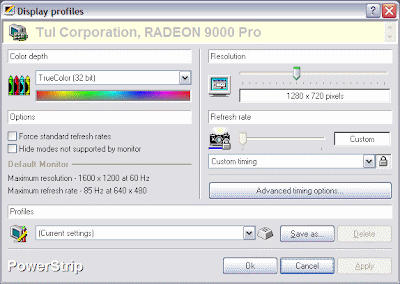
This is the "Display profiles" screen.
Make sure it is set to 1280x720 and click "Apply" if necessary.
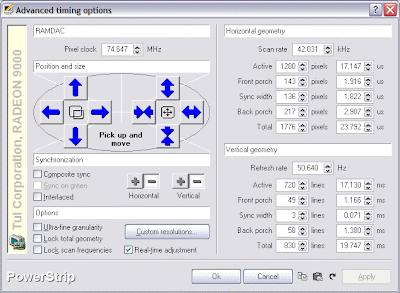
Next click the "Advanced timing options" button.
Advanced timing options screen:
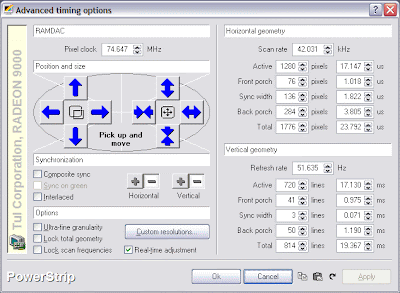
Ignore everything except the blue buttons!
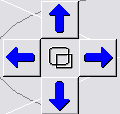
The Position buttons effect the position of the desktop on the screen. Click the right blue arrow and the image moves right, down and it moves down, etc. Simple, right?
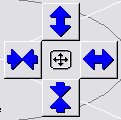
The size buttons will either shrink or expand the image horizontally or vertically.
Before you start clicking madly on the buttons be warned!
First of all, size buttons tend to make the screen blank for a few seconds. Don't freak out.
Going too far with any setting may make the image go blank and stay blank. If this happens simply hit your "escape" key and you will be taken back to the Display profiles screen with the previous settings.
Use a full screen window opened in the background using your web browser or something else to help you determine how to make your adjustments.
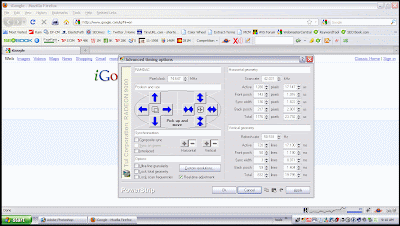
The best practice is to go slow. Improve things little by little, saving the settings by clicking "OK" and then going back in to make more adjustments. That way you don't have to start all over again if you go too far and have to hit your escape key.
When you get things to where you like them, use the "Save as" button on the Display profiles screen to save your settings with a name.
When you are sure of things, really sure and have restarted the computer and retested your settings it is time to set powerstrip to load automatically when Windows starts.
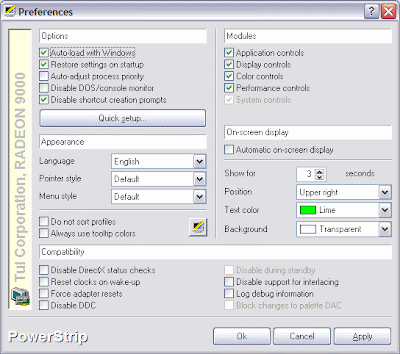
Right-click the powerstrip icon again and select "Options" and then "Preferences".
Then just check the box for "Auto-load with Windows"
Done!
Please annoy us with feedback on this article and suggest any further additions or subjects you'd like covered by commenting below.
Below is my final settings on a Samsung 720p TV using an Audio Authority 9A60 with a older Radeon card.
Your mileage may vary quite severely so be careful!
*Legal Warning! Trying anything suggested on this page is at your own risk. We are not responsible for any damage to your equipment, lifestyle or marriage!
Wednesday, July 15, 2009
FLEA MARKET TIME
Subscribe to:
Posts (Atom)