How to Set your Display Settings when connecting your Computer to your HDTV
Often the trickiest thing to explain to someone setting up their PC or Mac to HDTV connection is not even the hardware, cables or adapters required. It's explaining how to set a proper HDTV resolution in "Display Settings" that their HDTV is going to to "like".
First, you should check your HDTV's specs to see what what HDTV resolutions it supports. Usually 480i, 480p, 720p and 1080i, but of course newer HDTV's often support 1080p. We suggest that if your HDTV supports 720p you try that first. If you're sure your TV supports 1080p you can try that, but sometimes you could run into issues for a variety of reasons, so we'd say try 720p first, then try 1080p. Why not 1080i? Because it is often much trickier than 720p.
Note: You need to use a computer monitor when making these settings, and it MUST support the desired settings you want to use on the TV.
Warning! If a setting does not work, like you have scrolling wackiness or nothing on your screen, don't just leave it on your screen! I have never blown up or damaged a TV yet subjecting them to bad signals, but I am a paranoid son-of-a-gun, who turns off the TV fairly quickly when things just don't work out. There has to be a reason why manuals give you scary warning messages about using incorrect settings so always be ready to hit the off button on the TV when doing this sort of thing!
How to adjust your Display Output Settings:
OK, first "Right-Click" on empty space on your "Desktop" and select "Properties".
You should get something like this.
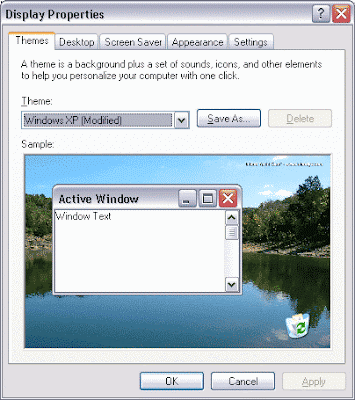
Here's what that should look like:Often the trickiest thing to explain to someone setting up their PC or Mac to HDTV connection is not even the hardware, cables or adapters required. It's explaining how to set a proper HDTV resolution in "Display Settings" that their HDTV is going to to "like".
First, you should check your HDTV's specs to see what what HDTV resolutions it supports. Usually 480i, 480p, 720p and 1080i, but of course newer HDTV's often support 1080p. We suggest that if your HDTV supports 720p you try that first. If you're sure your TV supports 1080p you can try that, but sometimes you could run into issues for a variety of reasons, so we'd say try 720p first, then try 1080p. Why not 1080i? Because it is often much trickier than 720p.
Note: You need to use a computer monitor when making these settings, and it MUST support the desired settings you want to use on the TV.
Warning! If a setting does not work, like you have scrolling wackiness or nothing on your screen, don't just leave it on your screen! I have never blown up or damaged a TV yet subjecting them to bad signals, but I am a paranoid son-of-a-gun, who turns off the TV fairly quickly when things just don't work out. There has to be a reason why manuals give you scary warning messages about using incorrect settings so always be ready to hit the off button on the TV when doing this sort of thing!
How to adjust your Display Output Settings:
OK, first "Right-Click" on empty space on your "Desktop" and select "Properties".
You should get something like this.

Use the little scroll bar for "Screen Resolution" until you get to 1280x720 pixels. If you don't have that option don't try something else like 1280x768 UNLESS you are connected to a VGA port on the TV and the TV supports that resolution. 1280x768 will not work with DVI, HDMI or when using a VGA to Component video "Transcoder".
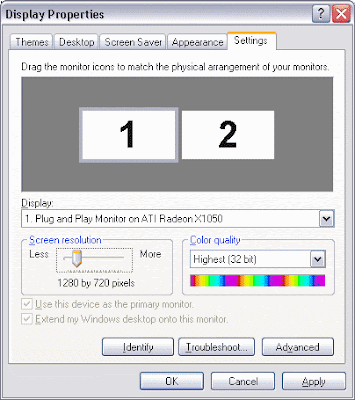
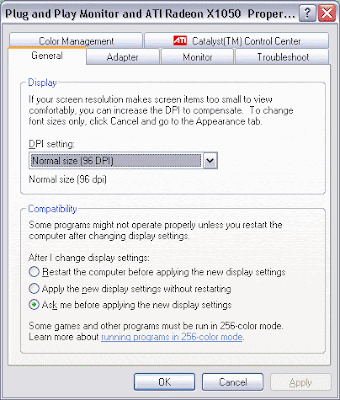
OK, now click the "Advanced" Button. You should get this.
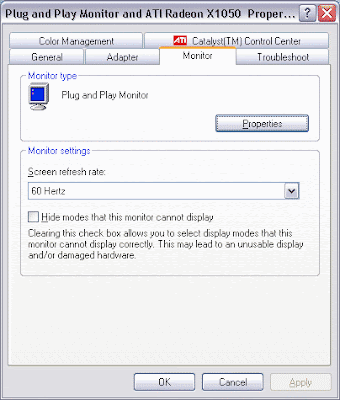
Click the "Monitor" Tab. Make sure the "Screen refresh rate" is set to "60 Hertz".
Click the "Apply" Button, and the setting should be set, if you don't get a visible image, do nothing and it should reset back to normal in 15 seconds. You should NOT restart your computer with the new settings! You still need to align the image properly and adjust for "overscan".
Now this part is where things vary. This computer has an ATI Video card. It uses ATI's Catalyst Control Center. Nvidia or Intel Graphics, etc will have different applications that often have similar functionality. Intel Graphics chips may lack resolutions or functionality required to set up things properly, so you may have to upgrade to a new Graphics card.
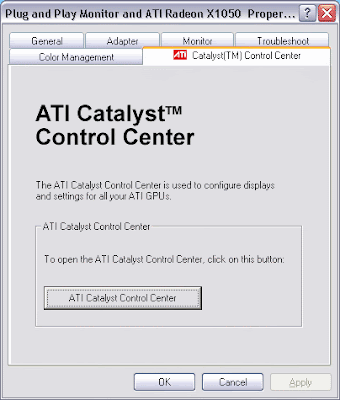
This is the ATI Catalyst Control Center.
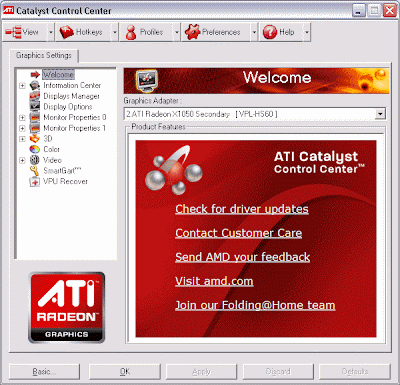
Click the "+" sign to the left of "Monitor Properties 0" if the HDTV is going to be the main display, or "monitor 1" if you are going to be using 2 displays in "clone" mode or something.
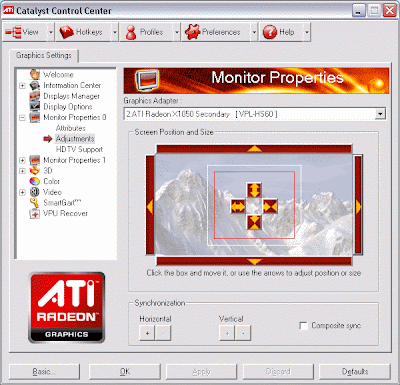
Click "Adjustments" and use the outside arrow controls carefully to move the image on the display up, down, left or right. Use the inside arrow controls to adjust for the image size vertically and horizontally. Take it slow and easy.
If necessary:
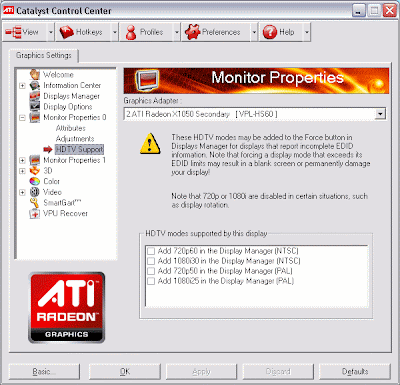
Read here for ATI's "HDTV Support" settings. You can enable support for the settings your sure your HDTV supports and then "force" them if required. If you don't get a picture after doing so, turn off the HDTV, reconnect your monitor and try something else.
Have fun! You can now say to freinds "I use my computer as an HTPC" or better still, "I use my computer as an HD-HTPC". Have fun watching Hulu, Netflix or other online TV services "full-screen" on your HDTV. Amaze your friends! Browse the internet on your 50-inch plasma or LCD, etc. Whatever you do don't read ANYTHING about calibrating your HDTV for your computer to TV connection! (at least for a little while) . If you think this was hard, that's where you get your HTPC "masters degree"!
Warning! (again) If a setting does not work, like you have scrolling wackiness or nothing on your screen, don't just leave it on your screen! I have never blown up or damaged a TV yet subjecting them to bad signals, but I am a paranoid son-of-a-gun, who turns off the TV fairly quickly when things just don't work out. There has to be a reason why manuals give you scary warning messages about using incorrect settings so always be ready to hit the off button when doing this sort of thing!

Do you have info for the windows 7 set up?? I have a 1080 plasma with a vga wire running to my hdmi port #3 and it is set as monitor and all my setting s are set just as these ones but I cannot get my tv monitor to show the pc at all
ReplyDeletehad similar prob. found out DVI to HDMI ok. and vice versa i think. but vga to hdmi didnt work for me either. The vga signal still has to be converted to the Hdmi format...or something or another...lol. Anyways, the cable we got was useless. atleast my novice ass thinks so, considering all i wanted to do was display my pc on the big tele. I purchased a cost effective (meaning el cheapo) graphic card on the bay for my tower. under $20 that had dvi out. got the dvi cable to hdmi. Worked Perfectly.
DeleteThat's one way to do it. Adding a graphics card with DVI or better yet HDMI makes things a whole lot easier! For DVI cards you should look for one that is "HDCP ready".
DeleteGreat post! It's 2013 and because I'm using an old Sharp Aquos 32" HDTV, it's still relevant. Thanks!
ReplyDeletehi is it possible that by connecting my hdtv to my pc,its created a power surge and blown the pc?
ReplyDeleteIt depends on the AC wiring of the outlets they are connected to. If the ground potentials are different you could have an issue.
DeleteNote: You need to use a computer monitor when making these settings, and it ... monitorshdmi.blogspot.com
ReplyDeletehttp://www.free4world.net/2016/07/eyetv-369-build-7416-mac-os-x.html
ReplyDeleteInformative post. Also write on other laptop issues as it will be useful for people wanting to learn.
ReplyDeleteAwesome post
ReplyDeleteYour post is pretty useful I really appreciate it, I was looking for LG 27UD88-W Review is there anybody here who have tried this before?
ReplyDelete